NOVEMBER 2014

Marcos has been driven now and again, a bit of seat-of-the-pants tuning has eliminated an overly-rich fueling issue and it’s all running pretty well. The big outing this month was the Geelong Revival Historic 1/4 mile Sprints along the curved Ritchie Bvd at Eastern Beach. A superb location and an amazing collection of historic vehicles. We had a timed practice run followed by 2 official runs – one short of the scheduled program due to barrier repairs needed after they were hit by an errant vehicle. The Marcos recorded 16.2 seconds, 15.9 and a 15.6 on the final run to place 4th in the class for Production Sports Cars 1941 – 1977 Up to 2000cc. A great day and a massive amount of interest shown in the Marcos.

Posted in Uncategorized | Leave a comment

OCTOBER 2014

October started off with an invitation from my local car club to bring the Marcos along to their regular monthly dinner meeting. The Marcos was driven into the dining room at the Drouin Golf Club where the meetings are held and following the meal, a short talk was given about the car and its restoration. Being such a rare beast in this country, it attracted a fair degree of interest.

The following weekend we participated in a practice day at the Bryant Park Hillclimb circuit where it was found that head-space was non-existent with a helmet on, making driving this undulating and twisty circuit quite difficult and uncomfortable. Despite this, the car ran well and handled beautifully.

Geoff Dunlop of Sydney, is the owner of the sister car to mine (MM 7057) and he’d been following the build of 7056 fairly closely. He noted the problems I’d had obtaining Perspex headlight covers that fit properly and offered to form up a set from a pair of headlight cover moulds made from his car, many years ago.
I was planning a trip north to Canberra, so it seemed like a good excuse to make a 560km detour into Sydney to catch up with Geoff, check out his Marcos and collect the covers. Geoff and his wife were very hospitable and it was tremendous to meet another Marcos owner.


Back home, it took a couple of days solid work to trim and shape the covers, make up some stainless steel brackets and fit them onto the car, but they do fit nicely and I think I prefer the look of the car with the covers on.

Looking forward to running the car in the Geelong Revival sprints next month.

Posted in Uncategorized | Leave a comment

September 2014

With the Marcos now up and running, the work on the car this month was really just tidying up a few loose ends.

Door cards are now in place, but I had trouble deciding on how to fit a door pull handle because I couldn’t find anywhere that I felt was strong enough to take the strain. In the end I settled on a couple of short straps connected to the latch mechanism – sometimes a simple solution is best  

I borrowed a set of computerised corner weight scales to find out what the Marcos weighed. I was surprised to discover that it is only 50 kg lighter than my 1964 Cooper S – I would have expected the difference to have been greater.

1964 Morris Cooper S – full alloy roll cage. spare wheel and about 1 gallon of fuel – 648 kg

1967 Mini Marcos GT – steel half cage, spare wheel and about 4 gallons of fuel – 598 kg

Some niggling minor tasks were completed over the last few weeks, so that now I’ve finally reached the stage where I’m satisfied with the build and happy to have others cast their eyes over it.

A couple of paint bubbles in the headlight recesses have been removed and the area repainted. Plastic chrome locking strips have been fitted to all the window rubbers replacing the black rubber strip fitted initially. The windscreen guy has been terrific – he fitted the black rubber locking strip because it’s more flexible than the chrome. It helped the glass and the rubber settle in over a few weeks so that it was then easier to run the chrome strip around.


I’ve also added a crotch strap to the race harnesses, making them 6-point instead of 4. I found that with such a laid back driving position, the release buckle worked its way up from my hips and I couldn’t tighten the shoulder straps without pulling the buckle up towards my chest. The extra belt will also prevent submarining out of the belt in the case of an accident – heaven forbid  


So now that build is all over, I’ll try to find some time to enjoy the driving experience. We’re entered in a historic car quarter mile sprint along the waterfront of our state’s second largest city, Geelong, towards the end of November. It’s a fairly high profile event so I hope we don’t embarrass ourselves  

P1110793

Posted in Uncategorized | Leave a comment

August 2014

A momentous month of progress culminating in finally having the car dyno-tuned and on the road.

Earlier in the month  the interior trimming out of the Marcos began with lots of paper templates, messy contact adhesive and stretchy boat carpet. The sills and kick panels were done first so that the door seals could be put in place, then the rest of the trimming followed. It was a bit of a issue sourcing the correct profile of  door seal rubber that would not only fill the gap between door and frame, but also stay firmly attached to the fibreglass door flange. Once the door seals were on it was possible to refit the door check straps and an old spun aluminium external bullet mirror which I’ve had in storage for at least a decade waiting for a suitable classic to fit it to. Once the carpets in the front half of the cabin were in, the seats could be fitted, and then it was a matter of nutting out a couple of removable carpeted boards made up to cover the spare wheel, battery and fuel tank, whilst still fitting in and around the roll bar. Without the glass in place most of the rear trimming was accomplished through the rear window. Then a  pair of matching harnesses were clipped into place on the roll bar and some fabrication of seat belt mounting plates began that would safely and securely anchor the lap sections of the harness through the fibreglass body shell . Apart from the interior door panels (an original pair of fibreglass panels were picked up recently on UK EBay), the trimming of the Marcos was then complete. It’s amazing how much material is used and how many separate panels needed to be made up.

Fitting the fitting the front and rear screens and rear quarter windows was a real effort which I was glad to hand over to Gavin of Protector Autoglass. Some trimming of the bodywork windscreen flange was required before the new windscreen ( a pre-loved unit from New Zealand complete with sports car club sticker) would fit and all the window seals are fitted with a black rubber locking strip at this stage instead of the plastic chrome one. Once the glass and rubbers settle into place a chrome locking strip will replace the black rubber ones. With the windscreen in place, a suction mounted rear vision mirror and the windscreen wipers were fitted.

Monday 18th August – Big day today. Inspection and registration (Historic Club Permit) completed, number plates fitted and we’re now road-legal.    Even found somebody to insure her . With confidence running high after an initial 60 mile shakedown on the road, the Marcos was signed up for its first competition event, the Geelong Revival historic sprints in November.

After the initial shakedown, a few minor issues surfaced. A small oil leak from one of the oil cooler hose unions was easily fixed, as was a spongy brake pedal (later found to be caused by a not-quite-tight-enough pipe fitting at the master cylinder), one wiper lifting off the screen at speed needed a stronger spring, the engine breather hose needed to replaced and repositioned after drooping down when hot and melting on the exhaust manifold; and probably the most annoying –  the sliding windows in the doors being unable to remain tightly closed, especially over bumps and irregular surfaces.
I’d noticed some holes on the interior side of the window frames which I figured was for some sort of clamping device, but couldn’t find any information or pictures on what was missing so decided to make my own.
The knurled bolts are the side-screen fittings from my Bugeye Sprite and the aluminium bosses were turned up on my lathe. They have a rubber insert at the base that acts like a nylock nut, and the knurled bolt pushes a a rubber plug against the glass inside the channel to hold the glass in the desired position. After another 70 miles today the problems seem to be mostly overcome – although the wiper is still lifting off the screen at over 80mph

P1110600

With the car now having covered about 150 miles, it was booked in for a dyno-tune to set the Weber up properly, check the timing and so on.  I warned my dyno guy (who is on the larger side of svelte) to start doing some limbering up exercises in preparation for getting into and out of the car.

In the mean time it was back to the door trims – I thought (and hoped) that all the fibre-glassing and filling was well behind me, but the pair of old fibre-glass door cards that I picked up on UK EBay needed a bit more than the simple clean up that I had hoped was sufficient. Apart from the large holes for what I presume were window winding and door handle mechanisms, there were several large chunks missing and of course all the self-tapper holes around the perimeter don’t line up with the corresponding holes in my doors. So, out with the matting, resin and fillers to bring them back to Square One.

P1110604

Wednesday 27th August was a long and expensive, but productive day today at the Dyno shop.
The Marcos was trailered down to the outskirts of Melbourne (about 100km away) where, even before starting it up, we found a problem with the float on the 45DCOE Weber.  It should more correctly have been called a ‘sink’ as when checking the float level it was found to have a pin-hole leak and was half full of fuel – that explained the overly rich characteristics shown during my running-in sessions .
A new float, needle and seat and a different bleed-back valve were fitted. Then an oxygen sensor fitting was welded into the exhaust pipe just aft of the final 2 into 1 collector and a tangle of umbilical cords were hooked up to measure the mixture,  fuel pressure, air temperature, coil output and we even found a spot for a knock sensor.  The car was strapped down and given the first of many runs through the gears and up to 7000rpm in top.  The first run showed promise, but the old SU fuel pump couldn’t keep up with fuel demand and actually showed negative fuel pressure readings from 4500 rpm upwards – a sure fire way to melt pistons at somewhere like the Philip Island GP circuit. A portable fuel rig was hooked up and plumbed in ,and the difference was amazing. The fuel pressure was constant and the engine kept developing power up through the rev range.

We worked our way through through various jet changes to try and overcome a flat spot at about 2500rpm where it was indicating an overly rich mixture, but eventually fixed it by dropping back a size in the auxiliary venturies. That gave us an excuse to richen up the top end again where both torque and horsepower benefited.
With good reliable figures across the board we stopped playing with engine and decided to replace the old stuffed SU fuel pump with a new Carter pump and an adjustable regulator – the same set up that was on the fuel rig we had been using since the first run.
Phil (the dyno guy) was suitably impressed with the Marcos and especially the torque developed by the motor.  On the graph below the torque is the blue line (maximum was 71.2 ft-lb at anywhere from 3700 to 4600 rpm. Horsepower is the red line and it peaks at 75 bhp at 6200 rpm. These are at-the-wheels figures so the flywheel output would be significantly higher. The black line is the air-fuel ratio which remains in the 12:1 to 14:1 range throughout.

It was a long day, I arrived home just on dark, but I feel confident now knowing that we’ve optimised the setup and fixed a couple of potential disasters that would have cost me more than just a day on the dyno.

The door cards are still waiting to be sanded back, trial fitted and trimmed, and then we’ll just about be finished !!


Posted in Uncategorized | 3 Comments

JULY 2014

The engine assembly was completed early July after sourcing a new Cooper S pin-drive oil pump from Mini Sport in Adelaide who press out the drive shaft on a new standard small-bore pump and press in the longer Cooper S style shaft which they have manufactured in Adelaide. After all the trouble experienced with the cam, it only needed to be advanced about 3 degrees which was easy to do using the adjustable cam gear. The crazy thing was that I got slightly different results depending on whether it was timed from the inlet or exhaust lobes – I ended up settling on the average between the two. A fairly standard Mk.I Cooper S head, which had previously been fitted with hardened valve seats, was fitted with new valve springs, a set of 1.5 to 1 roller rockers and a blingy chrome rocker cover to set it off. The old flywheel / pressure plate assembly had already been lightened and balanced so they were refitted with new driven and diaphragm plates. The engine ancillaries were test fitted before fitting the assembly to the car, this hopefully ensuring that there were no surprises later on, and that all the right bits are on hand. It was also easier to figure out some type of low-profile throttle linkage for the Weber while it was easily accessible.

All the engine fasteners were subjected to a couple of days in the parts cleaner and then finished off with a wire wheel on the bench grinder. My fingers have stopped bleeding now and Jenny believes that I may be developing an Obsessive Compulsive Disorder (OCD).

The completed engine gearbox assembly was dropped into the front subframe where the engine mounts and drive shafts were bolted up. The complete subframe assembly was then almost ready to mate with the body. It just needed some sort of lifting bar arrangement to attach the body to my block and tackle to lift it high enough to slide the subframe assembly underneath. There’s not a lot of weight involved so I decided to use the engine steady bar mounting points on the firewall cross-member as pick-up points. The lifting tackle arrangement to help lift and lower the body shell onto the engine/subframe assembly did the job superbly and will be stowed away somewhere safe until needed again – hopefully not in the near future! Although I had offers of assistance from a couple of well-meaning mates to come over and help lift the body on, I think that using this assembly attached to a block and tackle, was less stressful and probably a more accurate means of achieving the desired outcome

With the engine subframe assembly now in place, most of the engine ancillaries were connected up. Some playing around with radiator and heater hoses was necessary to try and get a tidy arrangement, this included tracking down some 28mm hose joiners that were needed to enable everything to fit.

Throttle pedal and cable, carby linkages, air filters, heater and radiator hoses, exhaust pipe and muffler, as well as few other odds and sods were moved to the top of the To-Do List – with most bits in stock somewhere in the shed, some other bits being found on EBay,

The brake and clutch systems all bled nicely, then it was a matter of getting all four wheels pointing more or less in the same direction, fit the front shockers and then start on the interior.


Attempting to set the suspension geometry using string lines was interesting! Trying to establish an initial datum point, or even squaring the car up is very bit tricky with the offset rear subframe and asymmetric bodywork. Instead of using the lip of the wheel arches for measuring the height of the body, it was more accurate to use the underside of the sills or even the subframes to set ride heights. The rear wheels have been set with a touch of toe-in and only the faintest amount of negative camber. The front wheels sit with one degree of negative camber and a slight amount of toe-out.

Unfortunately a couple of paint bubbles have formed, one in each of the headlight recesses at the apex of the concave curves where the horizontal floor curves up and becomes a vertical face. My paint guy thinks it was caused by having too much paint on it – the paint shrank and pulled away from the panel as it progressively dried out. The shop is quite prepared to repaint it, which is great, but it’s certainly a disappointment. I haven’t found any other places on the car where this has occurred, and there are no other issues of concern.

Way back in this blog I was complaining about how working in the shed was becoming intolerable due to ambient temperatures hovering around the 42 degrees Celsius mark for long periods during the day. Seasons change and those of us dwelling on the underside of this planet are now in the midst of winter. By most standards our winters are fairly mild with overnight temps occasionally dropping below zero and day time maximums reaching up towards 10 degrees. I much prefer working in the shed during the colder seasons, because I can effectively warm the place with a potbelly stove (made from a couple of old truck brake drums). With over an acre of our property under native trees, there’s no issue in regard to fuelling the stove. It also comes in handy for boiling the billy and drying recently painted parts such as these exhaust hanging brackets that will soon be fitted to the Marcos.

After having an exhaust pipe bent up and fitted at the local exhaust shop, the engine was topped up with oil and coolant, the distributor set to where it might hopefully fire the plugs at the right times and a second battery set up to support the fitted unit – it was churned over to build up oil pressure then run for about 15 minutes at between 2500 and 3000 rpm to reach operating temperature and check the activation of the thermostat and radiator fan switch. Apart from a small water leak from one faulty radiator hose, it all went surprisingly well. After it cooled down overnight, the head was re-torqued and valve clearances adjusted.

The driver’s seat was bolted in securely and thanks to our 250-metre long driveway, it was possible to test the function of the clutch, gearbox and brakes. Everything seemed to be working OK, so our attention now turns to the interior trimming

Click on this link for video:

Some bonnet pins have been fitted, using the brackets and holes that were used by the original owner, but a bonnet prop has been added, it swivels in a nylon bush on one of the bonnet pin brackets and clips into place against the bulkhead when not in use. That’ll save carrying a stick around.

Posted in Uncategorized | 1 Comment

JUNE 2014

Substantial progress this month, spurred along by the threat of VicRoads to change the rules in regard to the Club Permit Scheme before I can get the car completed.

The Brazilian Mahogany dash panel was marked out and holes cut to accommodate the various switches, warning lights and instruments. The gearshift knob is laminated from the same timber. The wood was treated to several coats of 2K clear gloss, then when dry sanded back and given another couple of finishing coats.

Of course, when the dashboard is in place it’s impossible to access the back of the upper door hinges, so while the paint was drying on the dashboard it was an opportune time to hang the doors.
The doors were fitted with, new striker plates and nylon buffers; rebuilt hinges and refurbished latches which were fitted with softer springs. Because of all the fibre-glass repair work undertaken on the doors, especially rebuilding the handle mounting areas, fitting the door handles took a fair bit of finessing to get them sitting at the correct angle where the shafts lined up perfectly with the square holes in the latch mechanisms. When misaligned the handle would bind up, unable to freely return to the horizontal position on its own. Eventually the handles were set in place correctly and everything tightened up. The latches work beautifully with the softer springs – the doors close securely with a lovely soft double click, almost classic Jaguaresque. An old seatbelt and Mini hardware was used to fashion a pair of check straps to stop the doors opening too far.

The dashboard was installed with switches, warning lights and instruments – all wired up and where possible, tested. There is a radio and heater under the dash as well as a battery isolation switch, the choke and a 12V accessory socket. Behind the glove box door are the fuses and relays as well as a fuel pump isolating switch and dash light switch.
Two more holes were cut through the firewall to facilitate the speedo cable in one and the oil pressure gauge tube, water temp capillary line and choke cable in the other. I hope that’s all the holes that are needed.

Several old remote gear change housings were stripped down to assemble one decent one from all the less-worn components. The gearstick had to be bent back to bring it within reach, so the driver’s seat and steering wheel were fitted to get some idea of how much of a bend it needed.

The engine has been a major headache!
The cam was sent to Sydney to be ground to a special ‘sports’ grind by a well- recognised A-series expert. It returned 4 weeks later. Then it and the engine block were sent to local engine shop to be fitted with new cam bearings and to have the bores honed. It was then found that the cam journals were undersized and a set of +0.020″ bearings were needed. These proved very hard to find, but were eventually sourced, and sent down to the engine shop. The cam journals then needed to be reground to fit the over-sized bearings, so the cam was sent to Crow Cams in Melbourne where inconsistencies were detected with the base circle of a couple of lobes as well as some flat spots which meant a template had to be made and the profiles reground.
Meanwhile the bores were honed, but it took more honing than expected to bring the bores back into condition. The old pistons then had too much bore clearance so they were sent away to be built up with some sort of coating.
Everything eventually retuned to the machine shop where the engine man had nothing complimentary to say about the initial regrind in Sydney. The pistons are now sporting lovely blue skirts and the rings were gapped to match the newly honed bores.
The next problem was that the gudgeon pins were showing wear where the pistons rotate on them, but thankfully the gudgeon pin holes in the pistons were OK showing only negligible wear – I don’t understand how the hardened pins can wear more than the alloy pistons, but there you are!
Two more sets of spare ‘S’ rods with pistons still attached were dropped off at the engine shop to have their gudgeon pins assessed, with one set being deemed as suitable for the build.

Meanwhile, a 1 metre length of polished stainless steel exhaust pipe arrived from Mr Ebay to extend the twin tail pipes on the Torana XU1 muffler, and a longer speedo cable (to suit a Bugeye Sprite) arrived to replace the one fitted earlier which was a few inches too short. A couple of stainless steel strips with a rolled edge, which I’ll try to use as rain guttering on the door openings, were also picked up locally.

The engine build has begun in earnest, but after snapping one of the bolts that hold the engine block flange to the transmission case, the couple of hours work had to be reversed to get to the point where the broken off threads could be extracted by MIG-ing a 1/4″ nut onto the top of the broken off bolt.
The cam has now been timed in and the timing cover fitted. Unfortunately the new oil pump which I had in storage and had intended to fit, turned out to be a short shaft model to suit the small bore blocks such as my Bugeye uses, so another pump will need to be procured before the engine build can progress much further.

It’s been a busy month !!

Posted in Uncategorized | 3 Comments

MAY 2014

Work continues unabated, the reground cam eventually arrived back from Sydney, but when it came to replacing the cam bearings in the block it was found that the cam journals were undersized, therefore requiring oversized bearings. These were near impossible to find, but a set was eventually sourced and dropped off at the machine shop, who by now had honed the bores and discovered that the pistons now had too much clearance. The pistons were then pressed off the rods and sent to High Performance Coatings to be built up with 0.003″ of ceramic coating. They’re due back any day now!

Meanwhile a set of 1.5:1 roller rockers and compatible valve springs arrived, together with a nice vernier timing gear set up from Mr Swiftune in the UK.

Work on the dashboard is well underway, with most of the instruments having been pulled to bits, cleaned and rebuilt, but the speedo, which I believe is from an MGA (with an MGB pointer fitted) needed recalibration to match the 3.1:1 final drive and the 12″ wheels and tyres that the Marcos will be running.
My friendly instrument repair guy requested information on the number of turns the speedo cable performs over a 10 metre distance, so that he could do the recalibration.
As the gearbox was already built and the front subframe had already been fitted up with suspension and drive line components, it was simply   a matter of mating the two of them and rolling the assembly over the required distance.
This was made easier by having the subframe mounted on a mobile jig, but unfortunately the jig doesn’t allow the wheels to touch the ground, so a track was laid using 2″ thick boards for the wheels to run along.

The dutiful wife came in useful for counting the turns of the speedo cable drive as I pushed the front-end along the tracks. I used some twisted tie-wire as a pointer, wrapped around a match stuck in the speedo cable drive hole, and made a degree wheel out of cardboard that sat over the speedo drive. It all worked brilliantly and wifey thought it was great fun   – Yes, we are but simple country folk     …. and the answer was – 7 full turns plus another 60 degrees  

Whist the engine block, pistons and camshaft are away having magic cast upon them, it was time to approach the issue of wiring. As there wasn’t any loom in the car when I bought it, it’s a matter of starting from scratch and creating a multi-colour equivilent of the yellow brick road, which was a rather fantastical journey that ended up back where they started  
Beginning by stripping down a couple of old Mini wiring looms seemed like a good idea,  after untangling the spaghetti, there will hopefully be enough colour-coded wire to match components to their proper colours.  My head was hurting trying to keep track of what connects to what, so a mud-map (Australian slang –  a map drawn on the ground with a stick, or any other roughly drawn map) was thrown together to try and sort out the mess.

It’ll take while to create order from this chaos, but I’ve always found wiring to be almost a contemplative task and one of the most interesting parts of a restoration. I’m using a combination of spade terminals and bullet connectors with all joints soldered together. I love heat shrink tubing insulation although when working through tasks like this, I sometimes worry about whether I’m developing OCD  
Here we are testing a circuit with an old indicator switch and flasher can before committing
it to paper.

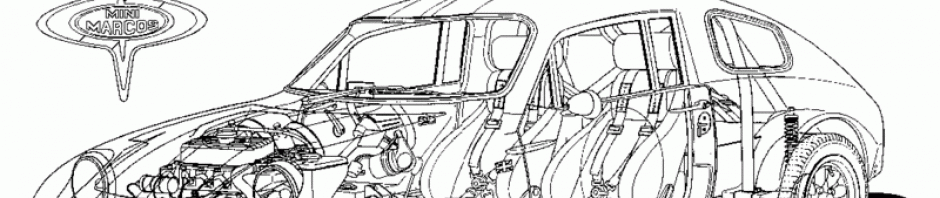
Unlike a Mini, all the fuses (8 of them), relays (3 of them) and the bulk of the wiring will be kept behind the dashboard. This should keep the engine bay relatively uncluttered from a wiring point of view. Keeping the the area behind the dash in order will be tricky though. There will be an MGA / MGB style speedo and tacho with 5 smaller Smiths gauges, a bank of switches and warning lights and an early model Mini column switch set up with indicators, dip and horn functions. Then there’s the radio/MP3 player. map light and so on.

Eventually all the wiring worked its way in and apart from the front and rear indicators showing opposite signals, all the bits I could test seem to work OK.  Some effort still needs to be spent tidying up behind the dashboard and laying out the wiring neatly in the engine bay.

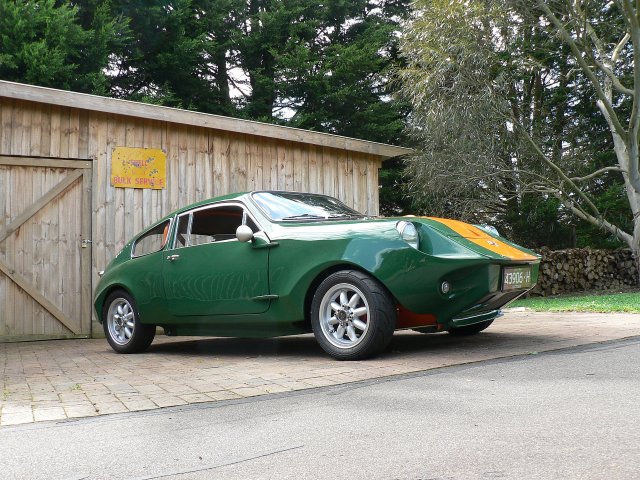
Very disappointed with the fit quality of the perspex headlight covers, they don’t go anywhere near the profile of the panels so we’ll do without until I can either find or make a better set    I understand now why Rodger Howard made his own !

Instruments  are a combination of new and old Smiths gauges. The Tacho (0 – 10,000 rpm) and the speedo which were originally fitted to the car are non-standard items, and according to Peter, my instrument repair guy, they’ve been assembled using a combination of components from various English makes and models. They’ve come up beautifully though and should look tremendous when fitted into the Mrytle wood dash panel.

I found this stainless steel Holden Torana XU1 muffler on ebay, it has a 2″ central inlet and fits neatly into the space inside the rear subframe. The twin exit pipes will need to be extended by 3″ or 4″ and I’ll have to weld some mounting plates onto it, but I think it has potential  .


The engine wiring has now been tidied up. All wires come through the firewall on the right hand side of the engine bay and track along the inner guard area. Thermatic fan and horn wires continue on through to the front housing while the rest track across the front of the engine bay and finally into the left hand wheel well.
The water temperature / oil pressure gauge capillary tube and oil line will track down the left hand side of the engine bay.  Not sure where to bring the speedo cable through the firewall yet   , will have to wait for the dash and engine to be in place first.

Posted in Uncategorized | Leave a comment

APRIL 2014

Still steadily making progress  
We now have a handbrake, battery, tail lights and a fuel tank plumbed up to a good old reliable SU pump complete with an in-line fuel filter. No leaks and after putting a new kit through the pump, it ticks away like a new one and delivers fuel to the engine bay   which is still awaiting an  engine. As far as the engine is concerned I am waiting for a reground cam and a set of refaced followers to be returned from a mini specialist in Sydney before I can clean, hone and fit new cam bearings to the block. The 0.040″ oversize pistons were in good condition so will be reused. However, replacement rings could not be sourced, so the ring groves in the pistons were machined to fit a different set of rings. A Holden Gemini pre-engaged starter motor has been stripped down, rebuilt and adapted to fit Mini flywheel housing. These turn the engine over faster than the standard Mini unit and being pre-engaged, don’t hammer the flywheel and Bendix gear as badly.


I’m not as flexible as I used to be   but still managed to somehow invert myself in the Marcos footwell to fit the heater assembly, steering column support, a couple of stereo speakers, the radio antenna and a hidden 12V power supply outlet – all under or behind the dash board. It took me a lot longer to extract myself from this position than it did to get in – much to my wife’s amusement. The chiropractor is on speed dial, but all’s good in the old spinal department so far  . Currently work is progressing on making some sort of frame or bracketry to support the wooden dash panel which will have radio slung underneath, as well as couple of hinges and a latch  for the wooden glovebox door, behind which will be the fuse and relay panel.

Having a few extra days off over Easter has been beneficial to our progress  
The radiator and oil cooler are now fitted up behind a woven stainless steel mesh grill, a second engine steady bar has been fitted to where the heater hoses disappear into the cabin, and a padded vinyl dash-top is sitting in place.

The front sub-frame is now fitted up with adjustable suspension components and Mini Sport’s light-weight alloy hub carriers. These use sealed upper and lower ball joints which simply screw into the top and bottom of the carrier. The only problem with that was finding a 46mm socket or spanner to tighten the ball joints – $100 later I had a huge ring spanner (shown here next to a 1/2″ spanner) which I proceeded to attack with a grinder to remove the beveled face of the ring so that it had good purchase on the very thin ball joint nut flange. New CV joints and brake discs are en-route from the UK; meanwhile, the calipers have been cleaned up and fitted with new seals and stainless steel pistons. They’ll be painted orange as soon as I take delivery of a couple of small rubber seals that fit between the 2 caliper halves.

Posted in Uncategorized | Leave a comment

March 2014

March has been a very productive month on the Marcos. The vehicle undersides, wheel wells, boot floor and front radiator areas have all been painted glossy black using POR15 – a hard-wearing paint that sticks tenaciously to fibreglass, hair and skin and cannot be removed with any type of solvent once dry (I needed a hair cut anyway!). With everything now painted, the assembly side of things began by feeding the hard brake and fuel lines through the left hand side sill. The right side will contain the battery cabling and wiring loom, but that’s a way off yet. The pedal box was fitted up under the dash and both master cylinders installed with new bundy tubing bent up and fitted into place.


The rear subframe was built up using rebushed trailing arms, adjustable suspension mounts, new brake components and shockers. It was then raised up into position under the car using a pair of trolley jacks, and bolted through the body onto the internal roll cage structure. It took a bit of fiddling to get it all to mate up, but now that it’s in, the rear of the car can now ride on its own wheels again.
After stripping down 2 Cooper S, 4-synco gearboxes in the hope of finding enough salvageable parts to make one good one, I was still in need of useable or unworn second and third gears. Luckily, I found a reasonably priced, new-old-stock third gear at a local parts supplier, but the second gear was harder to source and eventually came from the Netherlands at three times the price of the local third gear! Four new syncros, a new layshaft, new bearings and bushes were also fitted together with a new 3.1:1 final drive and cross-pin diff centre. Along the way I also managed to strip three gearbox casing threads, one for the mainshaft bearing retainer and two where the diff output shaft cover plates bolt up. The bearing retainer one I simply enlarged from 5/16 UNC to 3/8 UNC whilst the other two were treated to Helicoils. Another problem was with the 3.1:1 finial drive pinion – it’s physically larger in diameter than the standard 3.4:1 pinion and requires the mainshaft bearing retainer to be relieved or machined to enable it to fit over the pinion before  fitting into place against the bearing.


I’m a sucker for bling, so the new polished alloy, flip-top petrol cap is in position, as is the alloy radiator expansion tank and aftermarket alloy engine steady bar. All very pretty stuff.
The next stage is to complete the Cooper S engine strip down (now that the bench is free of gearbox components) and measure it all up to see if I can get away without a rebore, new pistons or a crank grind. Once again there’s two or three motors that could be used as parts donors, but I’d prefer to keep them intact if possible.

Posted in Uncategorized | Leave a comment

February 2014

This February has been one of the hottest on record in Warragul, with something like 7 days over 40 degrees which means there’s no way any work can be done outside or in the garage / workshop. There was, however  a run of pleasant mild days which was spent at Warragul Panels doing all the labour intensive work in wet-sanding the Marcos bodyshell down between coats of primer and various guidecoats. It was finished off with 800 grit wet and dry prior to painting and sprayed with 2-pack solid colour. It hasn’t been polished yet – that will be done after I’ve put it all together so that any accidental scratches and blemishes can be buffed out. All in all it was at the shop for 2 weeks and is now resplendent in the 1960’s lighter shade of British Racing Green (GN25) that was used on some Austin Healeys and MGBs of the time. The broad orange stripe certainly lifts the green and matches the powder-coated subframes and roll bar structure. The colour combination is, I’d like to think, unique, but there are obvious similarities to Lotus (green/ yellow) and even the classic Brabham (green / gold) racing team colours.

From the paint shop it was transported around town to Warragul Auto Trimmers where Dave used the tatty old vinyl roof lining as a guide to make and glue in a light grey stretch fabric roof lining the extends down the A-pillars and to below the rear and side windows.  With this in place it was then possible to squeeze the 4-point roll cage in through the doors and position it roughly in place so that the rear subframe can eventually be bolted up to it from underneath.

Whilst the body shell was away being fettled by experts, an old Cooper S engine and gearbox was dragged out of storage and partially stripped down for inspection. Unfortunately, the moly coating on both the 2nd and 3rd gears was worn away or damaged, so another spare box was broken down in search of a couple of useable replacement gears. Luckily the gears in the second box were OK, but the inside of the laygear showed wear on the case hardening so the best bits from either box will go together to make a good one. A list of new replacement bearings, baulk rings, shafts, lock tabs and gaskets has been drawn up and will be purchased as soon as I can finalize the requirements and find some money!

The engine is 1310cc, which is 0.040″ oversize. I don’t want to fully strip it down until the gearbox rebuild is out of the way; but the bores look good and measure up OK, so here’s hoping that a hone with new rings and bearings will suffice.

I’m pleased with the way the body shell has come up and am looking forward to the rebuilding process after 12 months of doing bodywork. The first parts to be refitted to the shell were the Marcos ID plate and the original importer’s tag (Competition Cars, Sydney) – the rebuild has begun!

Posted in Uncategorized | Leave a comment