January 2014

It reached 40C in the shed before midday today, so after applying the initial coat of primer-filler to the driver’s door, I thought I might as well retire to the refrigerated air of the house and bring this website up to date. It sounds ridiculous, but it’s taken me 2 weeks to prepare one door for a primer coat – admittedly it had at some stage been damaged and the repair, whilst replacing a portion of the door skin, had not addressed the hundred or so stress fractures in the surrounding jell coat. Over time these had flexed, opened up and cracked the paint work. After the initial damage to the door had occurred, a second incident must have happened that broke away the door skin flange at the bottom trailing edge of the door. Of course that then created more stress fractures in the jell coat around that location! Added to that, the ‘pads’ in the bottom of the door cavity which support and secure the window frame had broken loose, the inside of the oval hole which houses the door handle escutcheon plate had broken off and disappeared, and the metal reinforcing plates at the hinge mounting points had been removed. The repairs I’ve made have taken an eternity because after rebuilding the missing corner, strengthening the hinge area, closing over the door handle hole and securing the window frame mounting pads, I decided to sand away about 50% of the door’s surface area to get back to a reasonable base layer without cracks, I then layered it up with some woven tape and used a flow coat resin to build it back up. When that set, it required reshaping and that’s what’s taken all the time. I’m no sculptor!

I know that the passenger side door also needs work at the hinge mountings points where the metal plates are now exposed and the glass around them has cracked. The door handle hole is also busted in the same way as the driver’s door, and the lower edge of the door skin is very ratty, it’s cracked and in places hollowed out! But, the door skin looks OK – what lies beneath the paint is something I wait in dreaded anticipation of finding out,  once work begins to remove the paint on that door.

The pitted and corroded alloy window frames have been taken away by a local metal polisher, whose bread and butter is polishing alloy truck bull-bars and fuel tanks. He seemed to think a reasonable finish was not out of the question, and quoted less than $100 to do the pair.

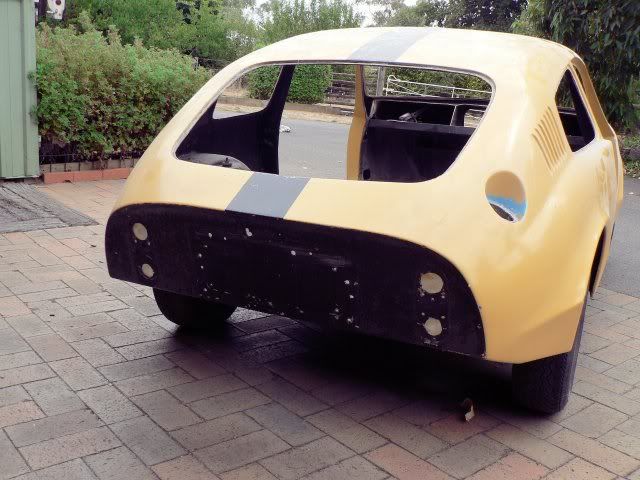
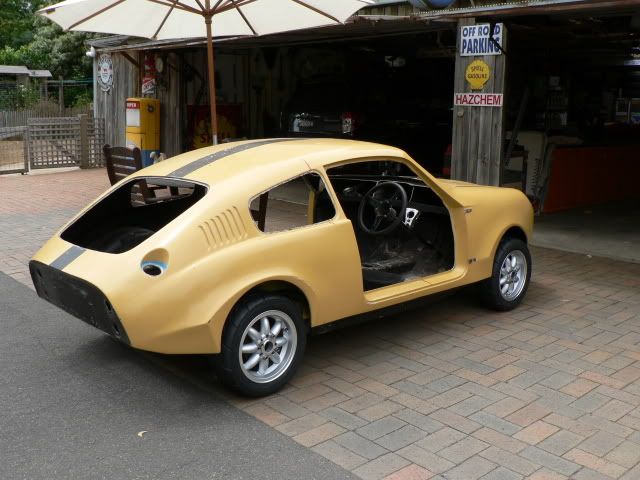
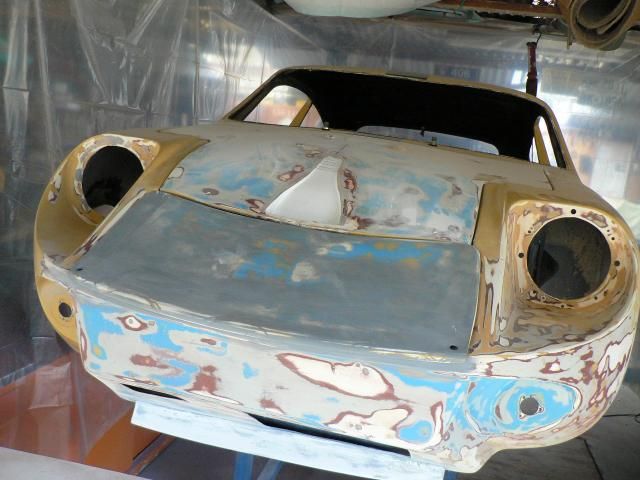
The body of the Marcos is now fully primered and it actually looks pretty good ! A mate who runs the local panel shop is coming around this week to inspect the car and to quote on respraying it – he’ll probably find areas that need more work, so we’ll see what happens when he turns up.

Posted in Uncategorized | Leave a comment

December 2013


Yuletide celebrations have come and gone, much eating and pressies were enjoyed with families and friends, and in between, some valuable time was dedicated to the Marcos. It’s now12 months since I picked the car up in Brisbane and dragged it home on the trailer, so I tried to recognise this by at least removing all the paint from the shell and placing it on its own set of wheels.

It’s now quite mobile and can easily be maneuvered in and out of the garage for sanding and painting. This set up will also enable me to carry it on the trailer should I decide to have it painted professionally, or to the trimmers to have the roof lining installed.

With all the paint removed I’m now using a grey primer-filler coat followed by a black guide coat to find imperfections such as waves, hollows and pin holes which can then be filled and sanded back. In most cases the guide coat’s not necessary as the problems are fairly obvious with just the primer coat coverage, but the complex curves of the Marcos are great for hiding the odd wave or two. Ever so slowly the panels are starting to smooth out – Not being familiar with how good the original fibre-glass panels were back in 1967, I may be creating more work than necessary!  If you have an insight as to the standard of the original Marcos bodywork, I’d be delighted to hear from you.

Posted in Uncategorized | Leave a comment

November 2013

This last week or so I’ve been able to get stuck back into the bodywork. All the paint has now been removed from the shell, except for the roof panel – which I won’t be able to reach until I make a shorter frame to sit the body on. There are numerous cracks in the gelcoat around the lower rear quarters which I’ll have to look at, and a large crack right through the fibreglass at the top of the driver’s side rear wheel arch. The worst sections, however, were both the sills. This must be where the panels are joined out of the mould at the factory, because there was a line of air pockets, bubbles and  filler on both sides of the car that needed a lot of work to make right.

The fiddly door frame sections were also in need of repair. The areas where the latch hardware attaches was very thin and parts of the flange had cracked all the way through. There was also a large hollow area at the top of the passenger side frame that had missed being gelcoated entirely. The previous owner had at one time fitted metal guttering to the a-pillar and the section under the roof. The holes where screws supported the guttering were cleaned out and filled, as were the latch mounting holes after the area was reinforced with a few more layers of matting.

After laboriously sanding off the paint from the seven fake flutes on each of the rear quarters, I can understand and sympathize with those who cut them out and replace that section with a flat panel. Not only were they difficult to sand back, but there were numerous holes and cracks that will require filling further down the track.

P1090847 P1090764 P1090755 P1090837 P1090760 P1090759 P1090758

Posted in Uncategorized | Leave a comment

October 2013

October has been a very trying month with unbelievable windstorms and unrelenting weather that resulted in the loss of 7 mature trees on our property in weeks leading up to our annual Open Garden festival which runs across 2 weekends. Needless to say cleaning up the mess, rebuilding fences and gardens and preparing for both the Open Garden openings as well as our annual Open Garage with the local car Club, resulted in next to no work being done on the Marcos restoration this month.

Below is an edited version of a short article with some pictures that were published on the Car Club website and in their monthly magazine.

Piggybacking the Sporting Register’s Open Garage and Garden morning at the Schmidt’s onto the Baw Baw Shire’s Gardivalia Open Garden weekends seemed like a good idea at the time, but after gale force winds created havoc in the weeks leading up to Gardivalia – in this instance ripping mature trees right out of the ground and causing collateral damage to fences and the garden, time was at a premium to make the 3 acre property presentable for both events. Work was temporarily suspended on the Marcos project to attend to more pressing horticultural demands, so those who came to the Open Garage expecting to see a great leap forward in the little car’s progress would have been disappointed. However, there were plenty of interesting parts laid out next to the Marcos shell to illustrate how the components should eventually fit together to make a whole.

Ihe weather was cool, but fine, and many people took the opportunity to wander through the grounds and admire the well established garden and elevated picturesque outlook to the north and west.

The long driveway looked magnificent with the assembled membership’s collection of sporting and classic cars scattered in amongst the flowering bottlebrushes and towering Lilypillys. It was a much nicer selection of vehicles than the homogenous Camrys and bland motorised appliances that arrived the previous weekend for Gardivalia.

Posted in Uncategorized | Leave a comment

September 2013

More bodywork and tail light recess

Stripping back paint and repairing gelcoat cracks is still continuing, but we’re now up to the A-pillars and both sills have also been done. Thank God for the use of a mate’s pneumatic orbital sander which speeds up the progress no end! The underside of the sills (where I’m presuming the floor and upper fibreglass sections join?) is fairly untidy and will need some filling and reshaping before I’m happy with it – you can’t see it unless you’re laying on the ground; but it’d be nice to have it done properly.

Being a bit tired of working at the front end, I’ve made a start on the rear. All the old tail light and number plate holes were filled and sanded back making a nice clean flat panel onto which I could position the Fiat 850 tail lights that I had in storage. Unfortunately these lights need to be recessed into the panel about 20mm to make them look right, so using an old enamel bowl as a mould, I fibreglassed up a couple of circular dishes and then glassed them into the rear panel. I would have liked to make the recesses deeper, but any deeper than what they are runs into interference issues when fitting and removing the petrol tank. When test fitting the tank, I noticed that the hole in the floor extended beyond the flange at one point leaving a gaping hole through to the ground! So, while the place was littered with fibreglass debris, the hole in the floor was filled to more closely match the shape of the tank.

The engine bay has now been sanded back and some attempt made to smooth out the rough spots, especially where sections are joined together. It’s not going to be a mirror smooth finish under the bonnet, but hopefully it will be better than when it left the factory.

Posted in Uncategorized | Leave a comment

July / August 2013

20th August – More sanding / fibreglass repairs and boxing in the A-pillars 
After repairing gelcoat cracks in the base of the A-pillars it was time to think about ways of preventing this happening again. The A-pillar is, in cross-section, shaped like a triangle with 2 sides made from fibreglass and one side left open. This open face of the A-pillar is in the car’s interior and is usually covered by vinyl trim. They seem very flimsy so I decided to strengthen them by enclosing in the open side with fibreglass and bonding them to the inner fibreglass structure of the inner-guard /dashboard area. This has sort of made a triangular  box-section and spreads any load on the A-pillar over a much broader area thus hopefully reducing any further cracking.P1090373
 
27th July – More new parts, but work at a standstill
DSN Classics in the UK make some beautiful CNC machined components for Minis at quite reasonable prices. This week I received a couple of engine steady bars and other nicely made engine components that will eventually make it on to the Marcos.
Engine steady
Actual work on the bodywork has stalled whilst attending to the mechanical demands of my Bugeye Sprite which noisily expressed its discontent at being neglected, by emitting a constant and annoying whine from the differential. After having that repaired and then replacing it, the Bugeye then decided to strand me with an empty fuel tank whist the fuel gauge still registered half full. Dropping the tank and removing the sender unit showed the problem to be a siezed float arm pivot which was easily rectified, but a pain in the butt to get at.
Hoping to get back to the Marcos soon, but we’ll need to wait until after next weekend’s 6-Hour Relay at the Phillip Island GP circuit where I’ll be running my ’68 Fiat 124 Coupe – it’s been neglected recently too, so the outing should do it good 🙂
 
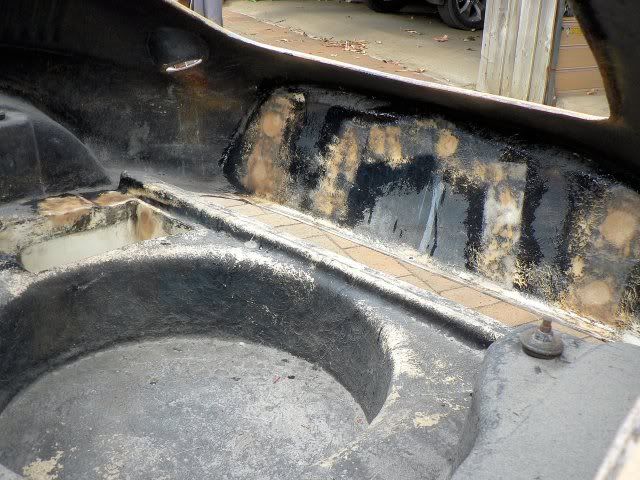
13th July – Accident damage resurfaces
Prior to the purchase of Marcos I was told that at some stage in the past the driver’s door area had been damaged by a ute reversing in to it. This incident also resulted in the windscreen being broken and the eventually the car being taken off the road. 
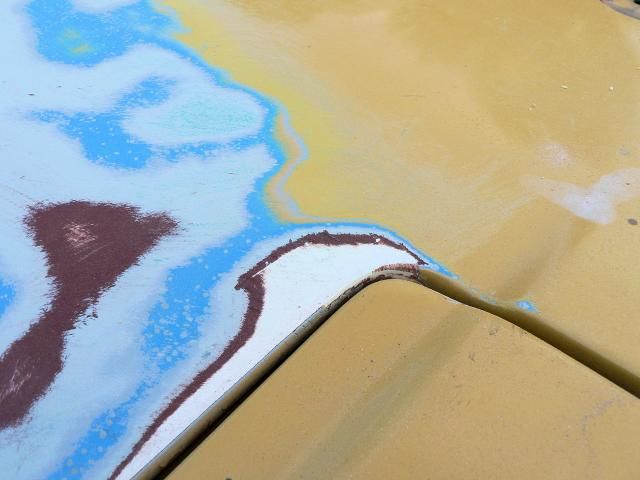
Sanding back the right front quarter panel has exposed stress cracks in the gelcoat around the upper door hinge, the base of the windscreen pillar and to a lesser extent the lip of the wheel arch.
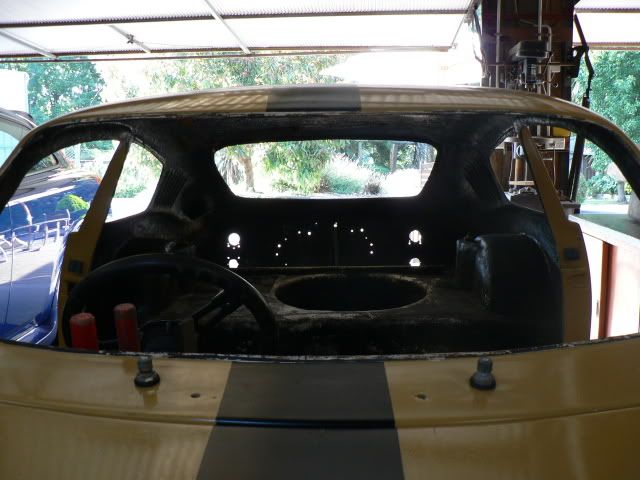
I’m planning on glassing in the open back of the A-pillars to give them some extra strength and the cracks only seem to be superficial with no damage to the fibreglass integrity. So they’ll be dug out and filled to prevent them from cracking the paint surface once it’s on.
P1090297P1090293P1090296


After sanding back the first application of filler, you can really see the extent of the cracks.
P1090336 
Posted in Uncategorized | Leave a comment

May / June 2013

29th June – Slow progress
With work on the Marcos taking a back seat to earning a living this last couple of week,unfortunately very little progress has been made.
The bonnet has been stripped right back and all the cracks dug out and refilled. There were significant cracks at the trailing edge which had allowed the bonnet to sag at the back, so some re-glassing of that area whilst being held in shape was required. There were also cracks at the hinge pins and corners. 
Once the shape was OK, the bonnet was sprayed with a primer/filler to show up any further irregularities (of which there were many) then sanded back and touched up with spot putty. If the temperature reaches double figures in the next few days, the putty might be dry enough to sand back, before another blast of primer goes on. 
P1090223
 
15th June – NACA duct
Well, it was one way to repair the damaged leading edge of the bonnet ! It might also help to draw the hot air from the radiator out of the engine bay.
The fibreglass duct, found on Ebay, came from England, it had a flange on the top which after fibreglassing into place, has been removed leaving the duct flush with the face of the bonnet. The front of the bonnet has also been reshaped to bring the leading edge down to the same level as the front panel. Repairs are also being made to a pair of bonnet-pin holes that were filled over, but cracking around the filler and then there’s a heap of other chips, cracks and irregularities to look at.
P1090215
 
10th June – Forensic sanding
In order to amuse myself when sanding the old paint back, I like to imagine how the car would have looked at the various painting stages it has gone through in the past. The fibreglass body would have arrived in Aus as a bare white gelcoat shell. If you go by the colours on the bonnet and front panels, it was then painted with a dark reddish-brown primer, a grey undercoat and a blue topcoat. At a later stage it was then re- painted the current yellow ochre colour, then a very thin grey undercoat and more yellow ochre. The front guards however, tell a different story. There’s the white gelcoat, the reddish-brown primer and the grey undercoat, but then two distinctive layers of slightly different yellow ochre. No blue at all  and no grey between the 2 coats of yellow ochre!!
I can only assume that some panels were sanded back to the undercoat prior to the yellow ochre respray and some were not, and that some parts of the car needed priming between the 2 coats of yellow ochre. An interesting puzzle.
P1090204 P1090205
 
9th June – repairing cracked front guards
Whist working my way slowly along the bodywork from front to back, I found small cracks at the apex of both front wheel arches. Closer inspection showed that these cracks went all the way through!! So, they were opened up and cleaned out from the back side then repaired with multiple layers of glass supporting the arch on the inside and some fibreglass impregnated filler on the outside. The arch lip and face will be much stronger than when originally moulded. (Photos show the repairs to the inside of the guards as viewed through the headlight holes).
P1090157  P1090161P1090163P1090165
The driver’s side headlight mounting flange has also been extensively repaired after finding a mess of holes caused by somebody needing to refit the light bucket several times in slightly different positions.
 
24th May – Sanding and painting booth
Having decided that having my garage and everything in it covered in dust from sanding back the repair jobs on the Marcos was not at all pleasant, I created a very rudimentary booth type effect by draping Builders’ Film from the garage’s roof truss and some timber supports. It surrounds the Marcos on 3 sides and will hopefully confine most of the dust to this small area.
P1090147
The big test yesterday and today was to use the ‘booth’ to spray the roll bar with an etch primer and then an orange top coat. To keep the temperature above 10 C the pot belly stove was left going night and day and it seemed to do damn well considering there’s absolutely no insulation in the garage. The painting turned out well and the plastic caught a fair bit of overspray and airborne particles. The floor’s turned orange, but that should sweep out OK when dry.
P1090149
 
18th May – Chasing gelcoat cracks
Prior to the spoiler being ‘Sikaflexed’ and screwed into place, the lower front panel was sanded back and repairs made to any cracks or holes. P1090146That was easy enough because there weren’t that many to contend with, but then I decided to tackle the removable front panel which had more than its fair share of fine gelcoat cracks. 
The mighty Dremel with a ‘ball-like’ engraving bit was used to chase down the cracks and open them up so that some fibreglass-reinforced filler could be applied, then sanded back to make the repair.P1090145
 
15th May – Still playing with spoilers
After managing to shape the cut and shortened Alfasud rear spoiler into something that would both kick air up into the radiator and not look too boy-racerish, I made a fibreglass mould of it and then a one-piece fibreglass replica. Lots of mucking around with mould release, fibreglass matting, resin and gelcoat; but it worked out surprisingly well considering all the tales of disasters that I’ve heard.  The garage is now a mess with strands of filmy fibreglass strands everywhere and I’ve still got to cut the excess off the final fibreglass product and sand it back to the correct size.
A friend was so impressed with the outcome, she suggested I make more and advertise them for sale; but with a market of only  4 other Marcoses in the country, I can’t envisage volume sales for this product.
The picture shows the plastic reshaped Alfasud spoiler in the foreground, the fibreglass mould in the centre and the fibreglass spoiler behind that. 
 
fibreglass spoiler
PARTS –  Bits and pieces continue to arrive from England. I’ve now created a set of 16 plastic parts boxes (courtesy of Greg Noller) which contain all sorts of goodies related mainly to brakes, suspension and steering, but there’s still other boxes with bulkier items such as instrumentation, cooling hoses, brake pipes and catch tanks. The padded dash top has been refurbished in black vinyl with lovely orange stitching. A Gemini pre-engaged starter motor was picked up on Ebay for $21 and I’m trying to justify  replacing the old oil cooler, which has one slightly bent pipe fitting and looks a bit tatty next to the flash new radiator. 
 
4th May – Radiator mounting, Bonnet hinge and Dashboard
How can small things take up so much time?
The Rover MPI radiator is mounted vertically in the Rover Mini using circular rubber bushes – 2 at the top and 2 larger ones at the bottom. In the Marcos the radiator is lying at an angle closer to horizontal than vertical and in the cramped confines of the Marcos nose. A large squarish hole in the lower, front panel was cut to the size of the radiator core, whilst the original slot was half filled by fibre-glassing a section in, leaving a smaller opening to allow air to the oil cooler. Various attempts at making brackets to mount the rubber bushes to the internal panel work failed dismally, but perseverance won through eventually and the radiator and its cooling fan is now positioned securely in the nose.
P1090065
To direct airflow up through the radiator, an air-dam of some description will need to be fabricated and fitted to the lower edge of the front panel.
EDIT – I’ve been playing around with a plastic rear lip spoiler from an Alfasud and eventually settled on this as a possibility:
P1090077P1090078 
When purchased the bonnet hinges consisted of a permanently mounted pin on the passenger side of the bonnet and a loose bolt on the driver’s side that slid through a hole in the underside of the bonnet and into the corresponding hole in the front guard. To remove the bonnet you simply withdrew the bolt and lifted the bonnet away. A more permanent and robust alloy spring-loaded system has now been fabricated and fitted to the bonnet. It works brilliantly too.P1090067P1090068
Friend and cabinet maker Graham Longhurst has knocked up a Brazilian mahogany dash panel with a bull-nose lower edge and glove box door, using the original laminated plywood one as a template. The upper padded dash pad has been sent to the trimmer to be recovered and the delaminating plywood upper panel has been used to make up a fibreglass replacement panel which will also be covered with vinyl and fitted below the windscreen opening.
Graham also made a layered Brazilian mahogany gear-shift knob to match the dash panel – fantastic !
The layout of the dash will need to be finalised before the holes for instruments and switches can be cut out.
 P1090071P1090072
Posted in Uncategorized | Leave a comment

March / April 2013

23rd April – One bonnet / 2 bonnets / long bonnet / short bonnet ??

After considerable deliberation, research and anguish, the time had come to decide upon the bonnet configuration for this Marcos. Some of he later models have a single long bonnet incorporating the small removable front panel. Others retain the short bonnet, but remove the area under the front removable panel for access to a front radiator, whilst many prefer the stock set up with the removable panel removed exposing the upper rectangular opening providing air flow to a side radiator.As I will be running a front radiator,  the decicion was made to  cut away most of the panel below the removable front section which will give good access to the radiator, fan and any other ancillaries that find their way to that location. The removable panel has now been fitted with 3 Dzus fasteners to simplify access to the area beneath.

P1090009

RUST …….  Noooooo 

At various points on the Marcos there have been metal plates inserted into the fibreglass to carry the extra loads of subframes and suspension components. On a regular Mini the front of the front subframe is supported by a pair of 5/16″ bolts which attach it to the body of the car. In the Marcos, it’s not so much a case of the subframe being supported by the body; but rather the subframe supporting the bodywork. With access now gained to the front of the bodywork it was now possible to inspect these mounting points, unfortunately finding the passenger side one degraded to the extent of being rusted right through ! After removing what was left of the metal plate, and mounting the front subframe into position, it was easy enough to bend up an alloy plate and fibreglass it in to where the metal one had once been. When the fibreglass reinforcement is cured, it will be possible to drill a new locating hole to attach the subframe.

P1090006P1090007

P1090014


P1090011


14th April – Seats test fitted and old Dash stripped and evaluated
The seat brackets have now been bolted up to the new alloy crossmember and the seats test fitted to see how they work.  The seats can move side to side about 20mm on the cross-tube, but a couple of strategically located split pins will hold them in place.
P1090004P1090005P1090001P1090003The Mini Marcos Owners’ Club asked for expressions of Interest in regard to remaking a batch of original Dashboards, but after 5 weeks with no further details, I’ve decided to  make my own by reupholstering the upper dashpad that came with the car and reworking a wood, metal or fibreglass facia in a similar design to the original. A fibreglass top panel will need to be made to fill gap between the windscreen and edge  of the dashpad, but that shouldn’t be too difficult …. I hope.
 
6th April – Subframes back from powder-coating
Orange isn’t perhaps everybody’s piece of cake; but I’m planning for the car to have a broad orange stripe and rear panel, so the subframes are in keeping with that idea. I hope I don’t change my mind about the colour scheme further down the track. I’ve also decided to paint the roll bar orange 🙂
P1080846
 
31st March – Roll bar fabricated
The main hoop was bent up at Meridian Motorsport in Melbourne from a wooden template I provided. The tubing is seamless cold drawn steel and the 4 mounting plates attach to the floor at the rear subframe mounting points.   It’s a very tight fit to take it in and out of the car and it will need to be the first thing fitted inside whenever the interior is ready .
P1080835P1080837


13th March – Subframes removed
A few mates came around and helped lift the Marcos off its subframes and onto a wheeled platform to make it easier to tackle the bodywork. The front subframe had already been cleaned up and painted; but the rear one is in need of sandblasting and powder-coating.
P1080800


9th March – Building the Weber air box and filling more holes
The centre-upper section of the firewall had been removed in what I presume was an effort to  make clearance for a sidedraft Weber carby; but it was just a wide open hole to the cabin area, having never been boxed in or sealed up. There were also lots of other holes in the firewall that must have been for wires, cables pipes and such-like, so they were all filled up as well. Seeing as my dashboard will be different to the wooden one that the Marcos came with, it’s doubtful that any of the holes would have served their previous purpose anyway !!
P1080763_zps6265b890[1]

P1080764

.

Posted in Uncategorized | Leave a comment

January / February 2013

February 2013 – Fibreglass work begins
Lesson One – Wear long sleeves as well as gloves to avoid that prickly-skin feeling that lingers for hours afterwards.
Lesson Two – Have an ample supply of paper toweling and acetone, this is messy stuff.
Lesson Three – Have plenty of cut-to-size fibre matting or tape ready to go. Once you start with the resin, it’s too late to play around with scissors or matting.
 
An alloy crossmember has now been fibreglassed into the floor on both sides of the car to support the seat brackets and  masonite pads glassed in to support the  base of the seats.  as a result the floor no longer flexes like Rolf Harris’s wobble board and dozens of bolt and rivet holes in the floor were filled at the same time.
The rear panel had 36 holes in it – yes I counted them, and because I’m not anticipating using the Mini Van tail lights, all the old holes have been glassed over from the inside. Now they need to be filled from the outside before cutting new holes for the preferred tail light fittings which at this stage will probably be round ones from a Fiat 850 Coupe.

P1080757P1080759P1080760P1080761

18th February 2013 – Too bloody hot to work in the shed !!
Whoops! The result of a visitor who forgot he had a tall trailer behind his car
Almost 110F in the shed - too hot to do anything
Almost 110F in the shed – too hot to do anything
3.1:1 crownwheel and pinion, cross pin diff and other goodies from the UK.
Fibreglass test sheets, one with Gelcoat and 2 layers of chopped strand matting, the other 1 layer of woven tape.
Progress on the Marcos has slowed somewhat recently. I’ve picked up some extra work doing a big fencing job and a Health and Safety report so time has been a bit tight. The weather has also been a problem with a week of temperatures consistently over the old one hundred degrees F, it’s just too hot to work in the shed during the day and it stays hot well into the evening. The end of summer can’t come too soon and we really need a heap of rain to fill the tanks and save the garden.
I erected a 10′ square gazebo on our drive way to park a car under (out of the sun) while working in the garage, but a friend dropped by and accidently destroyed it with his trailer which didn’t have enough clearance. He was awfully embarrassed and paid for the damage. A new one is on the way 🙂
I’ve also been experimentng with fibreglass, making flat sheets with different combinations of gelcoat, matting and flowcoats to see how they turn out. Very messy, but the finished product is pretty good.
If you can’t work outside, there’s always the computer in the house with the air conditioning going. Trawling around looking for spare parts on line is intoxicating and eventually leads to unexpected expenditure! A couple of the mainstream Mini parts suppliers in the UK have just about everything I could possibly require for the Marcos. Our high dollar helps here with prices far lower, including freight costs, than what you’d pay in Australia, even if the parts were available here – I just hope the quality is good enough.
 
3rd February 2013 – Braised Weber DCOE

P1080684

Purchase one used Weber 45 DCOE 13 from ebay or your favourite purveyor of fine Italian carburettors. Strip it down completely and place carcass in a saucepan. Fill saucepan with water and the juice of 20 lemons to cover carburettor. Bring to boil and simmer lightly for 2 hours allowing scum to rise to the surface. Remove from heat and drain well. Blow all passageways clear with compressed air and scrub surfaces with a brass wire brush to a high sheen. Spray all inner and outer surfaces with WD40. Wrap in absorbant cloth and store until required.  Do the same with all the carby innards and store them with the carburettor body in a cool, dry location.
 
29th January 2013 – Pretty Rosepetals
These arrived on the doorstep today after ordering them from Midland Wheels in the UK on the 18th. Pretty good service and cheaper, even with the cost of freighting them half way around the world (and stainless steel wheel nuts), than just buying the tyres in Aus. Crazy !! Wheels are 12″x 5″ Rosepetals, tyres are 165/55/12 Yokohama A048R with pretty much the same overall rolling circumference as a 165/70/10.New rosepetals (3) New rosepetals (1)

.

.

SEAT MOUNTSNew rosepetals (2)
Playing with the alloy MIG welder again. The crossmember will be fibreglassed into the floor and the brackets bolted into the crossmember. A masonite plate fibreglassed into the floor, will sit under the rear of the seat to strengthen that section of the floor.  The same setup needs to be made for the passenger side which has, of course, a different shaped and sized floor to the driver’s side.
 
26th January 2013 – PLAYING WITH FIRE
The last time I used an oxy on a fuel tank it exploded – this time I made sure that after 2 days in a hot tank and a week ventilating with some WD40  inside, nothing flammable was left to ignite. The upper rear section of the tank had been sitting against something saturated (like wet carpet) causing corrosion and a number of pin holes in the worst affected sections. These were brazed up using my ebay-purchased Dillon MK.III oxy torch. The hole next to the drain plug was also repaired by brazing a small metal patch over it.P1080603
 My aluminium MIG welding is starting to look more acceptable, however I ‘m still playing with all the settings such as Voltage, Wire feed speed, Gas pressure and wire length, and still  using up too much wire and gas to make a decent bead.
P1080599 I did manage to fabricate up an alloy steering column mount which is bolted to the parcel shelf horizontal support and by rods to the pedal box assembly. It all triangulates nicely and is very stable.
 
 
15th January 2013  – The FUEL TANK
Sitting for 20 years with 5 or 6 litres of petrol in it really doesn’t do the tank’s metal innards that much good !! The stinky old petrol had really gone off,  but apart  from  a small hole plugged with a self-tapper, and some surface rust on both the inside and outside surface the tank is quite salvageable.
The Marcos petrol tank is the unit out of a 1960's Mini Van
The Marcos petrol tank is the unit out of a 1964 Mini Van –  the manufacture date was found stamped on the tank’s flange.
After removing the siezed-up fuel gauge sender unit, the tank was dropped off at the local engine reconditioner for a day or two in their hot tank. This got rid of the loose rust and paint and made it safe to braze up the afore- mentioned plugged hole. The Smiths fuel gauge and the tank’s sender unit didn’t want to communicate with each other and after a brief examination, both units were sent of  Doctor Peter for some reconstructive surgery. I was later informed that these units would never have worked accurately together as they function on completely different systems.  They will, however, now be made compatible.
 
2nd January 2013, MORE HOLES
The lights, the wiring, the brake and fuel lines, and the petrol tank have all been removed. Any pop rivets that were holding brackets to the shell have been removed and I’m left with a clean shell with lots of empty holes.
Plenty of holes to fill.
The holes will all be filled so that I can start rebuilding again from scratch. I’ve decided to keep the body as original as I can ie. no flared guards or add-ons, but after much deliberation, and for my own piece of mind, I’m going to build a half cage for it. That way I can use it occasionally on the track and have somewhere solid to mount a pair of harnesses to. Only problem is I no longer have access to the MIG and TIG welders I had at my old job, so I’ll be looking to buy a MIG for the home workshop pretty soon.

Fuel tank location
The old trim is kept to be used as templates
All the old lining and trim panels have been stored away to use as templates when the time comes to fit the new interior.
 
Posted in Uncategorized | Leave a comment

December 2012

28th December 2012,  SEAT & STEERING  
Sitting comfortably in the car, the position of the seat in relation to the pedals and steering wheel can now be established and I can look at fabricating some seat mounts as well as supporting bracketry for the steering column. I’m not using the extended column that came in the car, it was way too long and pushed the seat so far back under the sloping roof that there was no headroom for my 6’1″ frame at all !! I have a spare standard column and that will do the job nicely.
Setting up positions for steering and seat.

Setting up positions for steering and seat.

20th December 2012, THE STRIP-OUT
The doors are off – and that makes it so much easier to get in and out of . The glass has been removed without damaging anything, and that’s allowed me to remove the headlining, sun visors and other trim pieces so that I can now sit in the car without the headlining resting on my head.
Stripped out - no doors, glass, trim , wiring or brake and fuel lines.
Stripped out – no doors, glass, trim , wiring or brake and fuel lines.
 
Posted in Uncategorized | Leave a comment