
23rd April – One bonnet / 2 bonnets / long bonnet / short bonnet ??
After considerable deliberation, research and anguish, the time had come to decide upon the bonnet configuration for this Marcos. Some of he later models have a single long bonnet incorporating the small removable front panel. Others retain the short bonnet, but remove the area under the front removable panel for access to a front radiator, whilst many prefer the stock set up with the removable panel removed exposing the upper rectangular opening providing air flow to a side radiator.As I will be running a front radiator, the decicion was made to cut away most of the panel below the removable front section which will give good access to the radiator, fan and any other ancillaries that find their way to that location. The removable panel has now been fitted with 3 Dzus fasteners to simplify access to the area beneath.

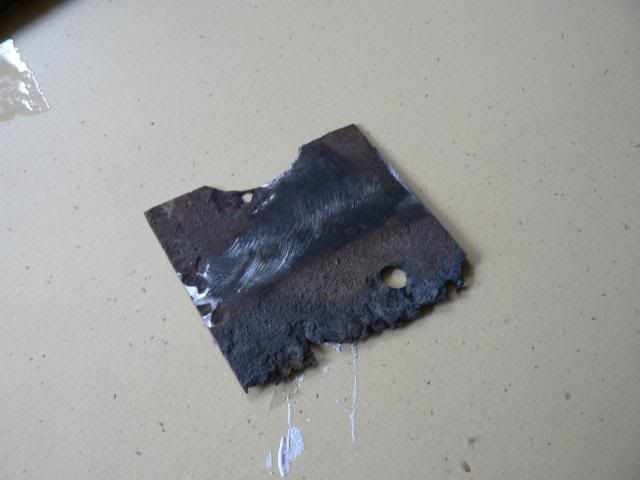
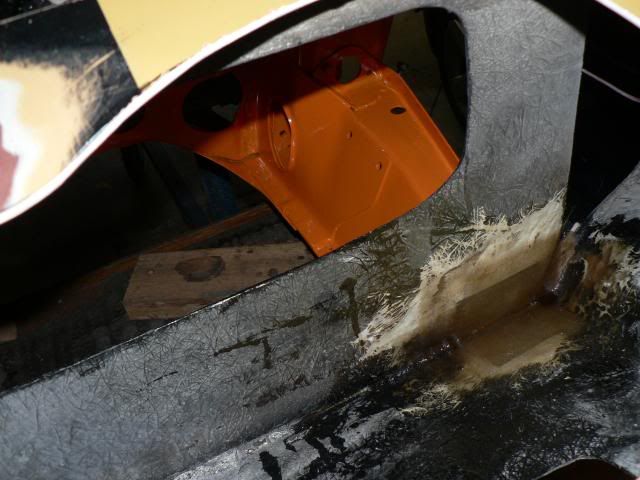
RUST ……. Noooooo
At various points on the Marcos there have been metal plates inserted into the fibreglass to carry the extra loads of subframes and suspension components. On a regular Mini the front of the front subframe is supported by a pair of 5/16″ bolts which attach it to the body of the car. In the Marcos, it’s not so much a case of the subframe being supported by the body; but rather the subframe supporting the bodywork. With access now gained to the front of the bodywork it was now possible to inspect these mounting points, unfortunately finding the passenger side one degraded to the extent of being rusted right through ! After removing what was left of the metal plate, and mounting the front subframe into position, it was easy enough to bend up an alloy plate and fibreglass it in to where the metal one had once been. When the fibreglass reinforcement is cured, it will be possible to drill a new locating hole to attach the subframe.

 14th April – Seats test fitted and old Dash stripped and evaluated
The seat brackets have now been bolted up to the new alloy crossmember and the seats test fitted to see how they work. The seats can move side to side about 20mm on the cross-tube, but a couple of strategically located split pins will hold them in place.
14th April – Seats test fitted and old Dash stripped and evaluated
The seat brackets have now been bolted up to the new alloy crossmember and the seats test fitted to see how they work. The seats can move side to side about 20mm on the cross-tube, but a couple of strategically located split pins will hold them in place.

 The Mini Marcos Owners’ Club asked for expressions of Interest in regard to remaking a batch of original Dashboards, but after 5 weeks with no further details, I’ve decided to make my own by reupholstering the upper dashpad that came with the car and reworking a wood, metal or fibreglass facia in a similar design to the original. A fibreglass top panel will need to be made to fill gap between the windscreen and edge of the dashpad, but that shouldn’t be too difficult …. I hope.
6th April – Subframes back from powder-coating
Orange isn’t perhaps everybody’s piece of cake; but I’m planning for the car to have a broad orange stripe and rear panel, so the subframes are in keeping with that idea. I hope I don’t change my mind about the colour scheme further down the track. I’ve also decided to paint the roll bar orange 🙂
The Mini Marcos Owners’ Club asked for expressions of Interest in regard to remaking a batch of original Dashboards, but after 5 weeks with no further details, I’ve decided to make my own by reupholstering the upper dashpad that came with the car and reworking a wood, metal or fibreglass facia in a similar design to the original. A fibreglass top panel will need to be made to fill gap between the windscreen and edge of the dashpad, but that shouldn’t be too difficult …. I hope.
6th April – Subframes back from powder-coating
Orange isn’t perhaps everybody’s piece of cake; but I’m planning for the car to have a broad orange stripe and rear panel, so the subframes are in keeping with that idea. I hope I don’t change my mind about the colour scheme further down the track. I’ve also decided to paint the roll bar orange 🙂
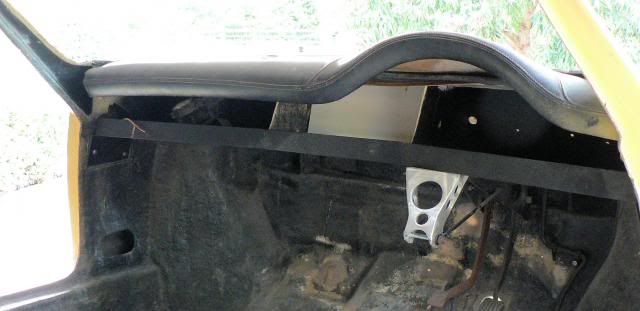
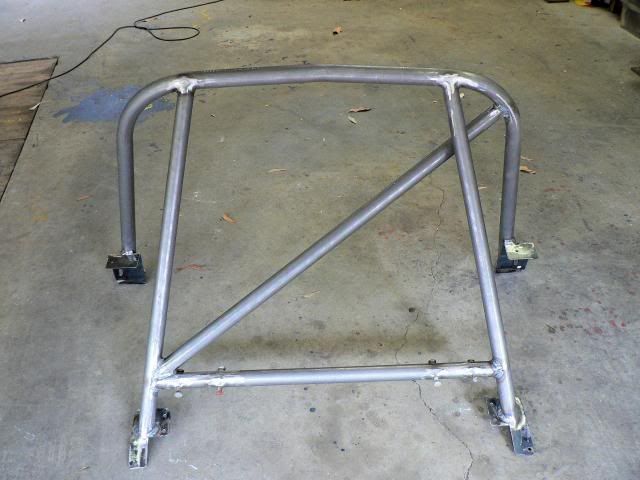
 31st March – Roll bar fabricated
The main hoop was bent up at Meridian Motorsport in Melbourne from a wooden template I provided. The tubing is seamless cold drawn steel and the 4 mounting plates attach to the floor at the rear subframe mounting points. It’s a very tight fit to take it in and out of the car and it will need to be the first thing fitted inside whenever the interior is ready .
31st March – Roll bar fabricated
The main hoop was bent up at Meridian Motorsport in Melbourne from a wooden template I provided. The tubing is seamless cold drawn steel and the 4 mounting plates attach to the floor at the rear subframe mounting points. It’s a very tight fit to take it in and out of the car and it will need to be the first thing fitted inside whenever the interior is ready .

 13th March – Subframes removed
A few mates came around and helped lift the Marcos off its subframes and onto a wheeled platform to make it easier to tackle the bodywork. The front subframe had already been cleaned up and painted; but the rear one is in need of sandblasting and powder-coating.
13th March – Subframes removed
A few mates came around and helped lift the Marcos off its subframes and onto a wheeled platform to make it easier to tackle the bodywork. The front subframe had already been cleaned up and painted; but the rear one is in need of sandblasting and powder-coating.
 9th March – Building the Weber air box and filling more holes
The centre-upper section of the firewall had been removed in what I presume was an effort to make clearance for a sidedraft Weber carby; but it was just a wide open hole to the cabin area, having never been boxed in or sealed up. There were also lots of other holes in the firewall that must have been for wires, cables pipes and such-like, so they were all filled up as well. Seeing as my dashboard will be different to the wooden one that the Marcos came with, it’s doubtful that any of the holes would have served their previous purpose anyway !!
9th March – Building the Weber air box and filling more holes
The centre-upper section of the firewall had been removed in what I presume was an effort to make clearance for a sidedraft Weber carby; but it was just a wide open hole to the cabin area, having never been boxed in or sealed up. There were also lots of other holes in the firewall that must have been for wires, cables pipes and such-like, so they were all filled up as well. Seeing as my dashboard will be different to the wooden one that the Marcos came with, it’s doubtful that any of the holes would have served their previous purpose anyway !!
![P1080763_zps6265b890[1]](http://img.photobucket.com/albums/v31/Curly/P1080763_zps6265b890.jpg)

.

