
 15th June – NACA duct
Well, it was one way to repair the damaged leading edge of the bonnet ! It might also help to draw the hot air from the radiator out of the engine bay.
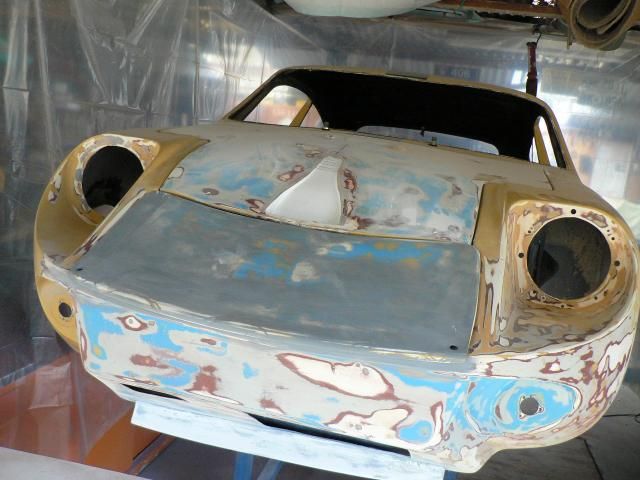
The fibreglass duct, found on Ebay, came from England, it had a flange on the top which after fibreglassing into place, has been removed leaving the duct flush with the face of the bonnet. The front of the bonnet has also been reshaped to bring the leading edge down to the same level as the front panel. Repairs are also being made to a pair of bonnet-pin holes that were filled over, but cracking around the filler and then there’s a heap of other chips, cracks and irregularities to look at.
15th June – NACA duct
Well, it was one way to repair the damaged leading edge of the bonnet ! It might also help to draw the hot air from the radiator out of the engine bay.
The fibreglass duct, found on Ebay, came from England, it had a flange on the top which after fibreglassing into place, has been removed leaving the duct flush with the face of the bonnet. The front of the bonnet has also been reshaped to bring the leading edge down to the same level as the front panel. Repairs are also being made to a pair of bonnet-pin holes that were filled over, but cracking around the filler and then there’s a heap of other chips, cracks and irregularities to look at.
 10th June – Forensic sanding
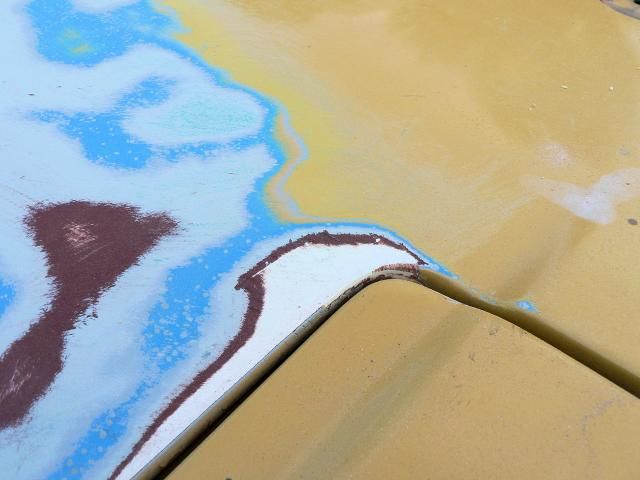
In order to amuse myself when sanding the old paint back, I like to imagine how the car would have looked at the various painting stages it has gone through in the past. The fibreglass body would have arrived in Aus as a bare white gelcoat shell. If you go by the colours on the bonnet and front panels, it was then painted with a dark reddish-brown primer, a grey undercoat and a blue topcoat. At a later stage it was then re- painted the current yellow ochre colour, then a very thin grey undercoat and more yellow ochre. The front guards however, tell a different story. There’s the white gelcoat, the reddish-brown primer and the grey undercoat, but then two distinctive layers of slightly different yellow ochre. No blue at all and no grey between the 2 coats of yellow ochre!!
I can only assume that some panels were sanded back to the undercoat prior to the yellow ochre respray and some were not, and that some parts of the car needed priming between the 2 coats of yellow ochre. An interesting puzzle.
10th June – Forensic sanding
In order to amuse myself when sanding the old paint back, I like to imagine how the car would have looked at the various painting stages it has gone through in the past. The fibreglass body would have arrived in Aus as a bare white gelcoat shell. If you go by the colours on the bonnet and front panels, it was then painted with a dark reddish-brown primer, a grey undercoat and a blue topcoat. At a later stage it was then re- painted the current yellow ochre colour, then a very thin grey undercoat and more yellow ochre. The front guards however, tell a different story. There’s the white gelcoat, the reddish-brown primer and the grey undercoat, but then two distinctive layers of slightly different yellow ochre. No blue at all and no grey between the 2 coats of yellow ochre!!
I can only assume that some panels were sanded back to the undercoat prior to the yellow ochre respray and some were not, and that some parts of the car needed priming between the 2 coats of yellow ochre. An interesting puzzle.

 9th June – repairing cracked front guards
Whist working my way slowly along the bodywork from front to back, I found small cracks at the apex of both front wheel arches. Closer inspection showed that these cracks went all the way through!! So, they were opened up and cleaned out from the back side then repaired with multiple layers of glass supporting the arch on the inside and some fibreglass impregnated filler on the outside. The arch lip and face will be much stronger than when originally moulded. (Photos show the repairs to the inside of the guards as viewed through the headlight holes).
9th June – repairing cracked front guards
Whist working my way slowly along the bodywork from front to back, I found small cracks at the apex of both front wheel arches. Closer inspection showed that these cracks went all the way through!! So, they were opened up and cleaned out from the back side then repaired with multiple layers of glass supporting the arch on the inside and some fibreglass impregnated filler on the outside. The arch lip and face will be much stronger than when originally moulded. (Photos show the repairs to the inside of the guards as viewed through the headlight holes).


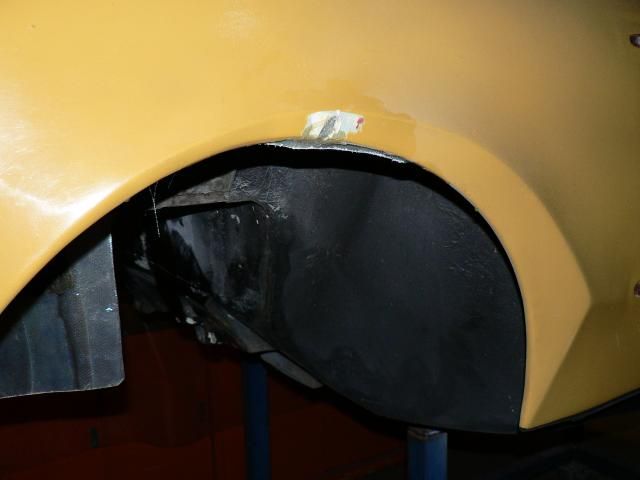
 The driver’s side headlight mounting flange has also been extensively repaired after finding a mess of holes caused by somebody needing to refit the light bucket several times in slightly different positions.
24th May – Sanding and painting booth
Having decided that having my garage and everything in it covered in dust from sanding back the repair jobs on the Marcos was not at all pleasant, I created a very rudimentary booth type effect by draping Builders’ Film from the garage’s roof truss and some timber supports. It surrounds the Marcos on 3 sides and will hopefully confine most of the dust to this small area.
The driver’s side headlight mounting flange has also been extensively repaired after finding a mess of holes caused by somebody needing to refit the light bucket several times in slightly different positions.
24th May – Sanding and painting booth
Having decided that having my garage and everything in it covered in dust from sanding back the repair jobs on the Marcos was not at all pleasant, I created a very rudimentary booth type effect by draping Builders’ Film from the garage’s roof truss and some timber supports. It surrounds the Marcos on 3 sides and will hopefully confine most of the dust to this small area.
 The big test yesterday and today was to use the ‘booth’ to spray the roll bar with an etch primer and then an orange top coat. To keep the temperature above 10 C the pot belly stove was left going night and day and it seemed to do damn well considering there’s absolutely no insulation in the garage. The painting turned out well and the plastic caught a fair bit of overspray and airborne particles. The floor’s turned orange, but that should sweep out OK when dry.
 18th May – Chasing gelcoat cracks
Prior to the spoiler being ‘Sikaflexed’ and screwed into place, the lower front panel was sanded back and repairs made to any cracks or holes.
18th May – Chasing gelcoat cracks
Prior to the spoiler being ‘Sikaflexed’ and screwed into place, the lower front panel was sanded back and repairs made to any cracks or holes.  That was easy enough because there weren’t that many to contend with, but then I decided to tackle the removable front panel which had more than its fair share of fine gelcoat cracks.
The mighty Dremel with a ‘ball-like’ engraving bit was used to chase down the cracks and open them up so that some fibreglass-reinforced filler could be applied, then sanded back to make the repair.
That was easy enough because there weren’t that many to contend with, but then I decided to tackle the removable front panel which had more than its fair share of fine gelcoat cracks.
The mighty Dremel with a ‘ball-like’ engraving bit was used to chase down the cracks and open them up so that some fibreglass-reinforced filler could be applied, then sanded back to make the repair.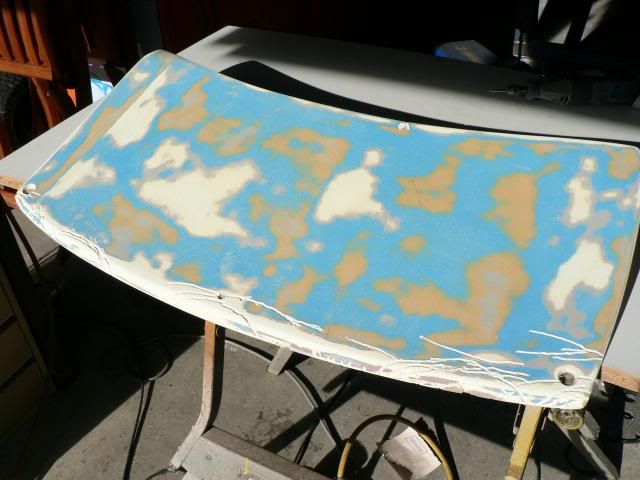 15th May – Still playing with spoilers
After managing to shape the cut and shortened Alfasud rear spoiler into something that would both kick air up into the radiator and not look too boy-racerish, I made a fibreglass mould of it and then a one-piece fibreglass replica. Lots of mucking around with mould release, fibreglass matting, resin and gelcoat; but it worked out surprisingly well considering all the tales of disasters that I’ve heard. The garage is now a mess with strands of filmy fibreglass strands everywhere and I’ve still got to cut the excess off the final fibreglass product and sand it back to the correct size.
A friend was so impressed with the outcome, she suggested I make more and advertise them for sale; but with a market of only 4 other Marcoses in the country, I can’t envisage volume sales for this product.
The picture shows the plastic reshaped Alfasud spoiler in the foreground, the fibreglass mould in the centre and the fibreglass spoiler behind that.
15th May – Still playing with spoilers
After managing to shape the cut and shortened Alfasud rear spoiler into something that would both kick air up into the radiator and not look too boy-racerish, I made a fibreglass mould of it and then a one-piece fibreglass replica. Lots of mucking around with mould release, fibreglass matting, resin and gelcoat; but it worked out surprisingly well considering all the tales of disasters that I’ve heard. The garage is now a mess with strands of filmy fibreglass strands everywhere and I’ve still got to cut the excess off the final fibreglass product and sand it back to the correct size.
A friend was so impressed with the outcome, she suggested I make more and advertise them for sale; but with a market of only 4 other Marcoses in the country, I can’t envisage volume sales for this product.
The picture shows the plastic reshaped Alfasud spoiler in the foreground, the fibreglass mould in the centre and the fibreglass spoiler behind that.
 PARTS – Bits and pieces continue to arrive from England. I’ve now created a set of 16 plastic parts boxes (courtesy of Greg Noller) which contain all sorts of goodies related mainly to brakes, suspension and steering, but there’s still other boxes with bulkier items such as instrumentation, cooling hoses, brake pipes and catch tanks. The padded dash top has been refurbished in black vinyl with lovely orange stitching. A Gemini pre-engaged starter motor was picked up on Ebay for $21 and I’m trying to justify replacing the old oil cooler, which has one slightly bent pipe fitting and looks a bit tatty next to the flash new radiator.
4th May – Radiator mounting, Bonnet hinge and Dashboard
How can small things take up so much time?
The Rover MPI radiator is mounted vertically in the Rover Mini using circular rubber bushes – 2 at the top and 2 larger ones at the bottom. In the Marcos the radiator is lying at an angle closer to horizontal than vertical and in the cramped confines of the Marcos nose. A large squarish hole in the lower, front panel was cut to the size of the radiator core, whilst the original slot was half filled by fibre-glassing a section in, leaving a smaller opening to allow air to the oil cooler. Various attempts at making brackets to mount the rubber bushes to the internal panel work failed dismally, but perseverance won through eventually and the radiator and its cooling fan is now positioned securely in the nose.
PARTS – Bits and pieces continue to arrive from England. I’ve now created a set of 16 plastic parts boxes (courtesy of Greg Noller) which contain all sorts of goodies related mainly to brakes, suspension and steering, but there’s still other boxes with bulkier items such as instrumentation, cooling hoses, brake pipes and catch tanks. The padded dash top has been refurbished in black vinyl with lovely orange stitching. A Gemini pre-engaged starter motor was picked up on Ebay for $21 and I’m trying to justify replacing the old oil cooler, which has one slightly bent pipe fitting and looks a bit tatty next to the flash new radiator.
4th May – Radiator mounting, Bonnet hinge and Dashboard
How can small things take up so much time?
The Rover MPI radiator is mounted vertically in the Rover Mini using circular rubber bushes – 2 at the top and 2 larger ones at the bottom. In the Marcos the radiator is lying at an angle closer to horizontal than vertical and in the cramped confines of the Marcos nose. A large squarish hole in the lower, front panel was cut to the size of the radiator core, whilst the original slot was half filled by fibre-glassing a section in, leaving a smaller opening to allow air to the oil cooler. Various attempts at making brackets to mount the rubber bushes to the internal panel work failed dismally, but perseverance won through eventually and the radiator and its cooling fan is now positioned securely in the nose.
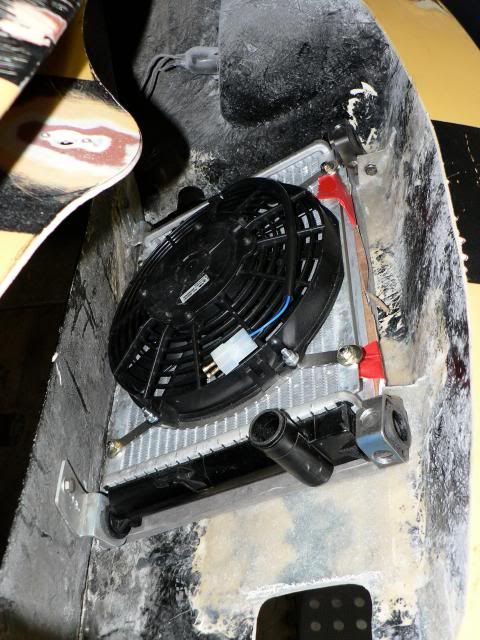 To direct airflow up through the radiator, an air-dam of some description will need to be fabricated and fitted to the lower edge of the front panel.
EDIT – I’ve been playing around with a plastic rear lip spoiler from an Alfasud and eventually settled on this as a possibility:
To direct airflow up through the radiator, an air-dam of some description will need to be fabricated and fitted to the lower edge of the front panel.
EDIT – I’ve been playing around with a plastic rear lip spoiler from an Alfasud and eventually settled on this as a possibility:

 When purchased the bonnet hinges consisted of a permanently mounted pin on the passenger side of the bonnet and a loose bolt on the driver’s side that slid through a hole in the underside of the bonnet and into the corresponding hole in the front guard. To remove the bonnet you simply withdrew the bolt and lifted the bonnet away. A more permanent and robust alloy spring-loaded system has now been fabricated and fitted to the bonnet. It works brilliantly too.
 Friend and cabinet maker Graham Longhurst has knocked up a Brazilian mahogany dash panel with a bull-nose lower edge and glove box door, using the original laminated plywood one as a template. The upper padded dash pad has been sent to the trimmer to be recovered and the delaminating plywood upper panel has been used to make up a fibreglass replacement panel which will also be covered with vinyl and fitted below the windscreen opening.
Graham also made a layered Brazilian mahogany gear-shift knob to match the dash panel – fantastic !
The layout of the dash will need to be finalised before the holes for instruments and switches can be cut out.
Friend and cabinet maker Graham Longhurst has knocked up a Brazilian mahogany dash panel with a bull-nose lower edge and glove box door, using the original laminated plywood one as a template. The upper padded dash pad has been sent to the trimmer to be recovered and the delaminating plywood upper panel has been used to make up a fibreglass replacement panel which will also be covered with vinyl and fitted below the windscreen opening.
Graham also made a layered Brazilian mahogany gear-shift knob to match the dash panel – fantastic !
The layout of the dash will need to be finalised before the holes for instruments and switches can be cut out.


